
COMP3431 Notices
Notices
-
Submitting your second report and code
Posted by Tatjana Zrimec Monday 24 November 2025, 01:52:56 AM.
Every student is required to individually submit a report of no more than 10 pages. Treat this as an extension of your first report, so include the material from assignment 1 and add the descriptions of your later work. The report must include the following sections:
- Background . What did you read/research to learn how to solve this problem (cite references).
- Methodology . How your group solved the task.
- Your individual contribution . This is the most important section and will be given the most weight.
- An evaluation of the performance of your software, including an explanation of the performance that was observed during the live demonstration.
- The limitations of your software, specifically any shortcoming or short cuts that were taken which may prevent your software solving some variations of the task, for example handling different maze configurations, placement of markers, sensitivity of variations in colours, etc.
- Reference section. This is where is include references from section 1. Use proper scientific report format (i.e. authors, year, title, where published). If the reference is a website, include the URL and date accessed.
Be very careful about getting help from a Large Language Model. They can invent non-existent references and add irrelevant information. Including false information, even by accident, is a serious problem, so check the text carefully.
Please format the references using one of the following referencing styles:
- APA - American Psychological Association Style - <u> https://apastyle.apa.org/style-grammar-guidelines/references/examples </u>
- IEEE referencing style - https://www.bath.ac.uk/publications/library-guides
Figures and tables should be numbered and have captions. Any references, figures or tables should be cited in the text, e.g, don’t just include them, without referring to them in the text.
If you have any additional material, like videos, photos or meeting notes, please include links.
Make sure to include your zID and group, as well as your name, at the beginning of the report.
Submission
Every student must submit a PDF file with their individual report through WebCMS or with the following command:
give cs3431 Report2 <zID>-report2.pdf
Note that the report file name should also contain your zID, e.g. 555555-report2.pdf
Each group will also submit their source code. Only one member of your group should submit the ROS source directory in compressed TAR or ZIP format, with a README file included (maximum size 100 MB). The README should contain instructions on how to run your code.
Only submit the src directory, not the whole workspace.
The give submission specification is as follows:
give cs3431 Code src.[tar.gz | tgz | zip]
You can also submit via this WebCMS page .
-
Additional lab week 10
Posted by Claude Sammut Monday 17 November 2025, 07:35:19 PM.
We'll run another extra lab on Tuesday week 10, starting at 2pm. Thursday groups may come at any time, but priority will be given to any Monday groups that have not finished yet.
-
Additional laboratory time in week 9
Posted by Claude Sammut Monday 10 November 2025, 04:39:37 PM, last modified Monday 10 November 2025, 07:04:10 PM.
There will be additional laboratory time in Week 9 on Tuesday 11/11/2025 for both labs.
As last time, we prefer:
- Monday lab groups from 14:00 to 16:00.
- Thursday lab groups from 16:00 to 18:00.
-
Additional laboratory time in Week 6
Posted by Tatjana Zrimec Friday 17 October 2025, 08:11:01 PM.
There will be additional laboratory time in Week 6 on Thursday 23.10.2025 for both labs.
We plan to have the following arrangement:
- Monday lab groups from 14:00 to 16:00.
- Thursday lab groups from 16:00 to 18:00.
I will send an email to each group with more details.
-
Report submission enabled
Posted by Tatjana Zrimec Friday 17 October 2025, 01:00:00 PM.
The report submission is now enabled.
You can submit via WebCMS (go to the submission tab for Assignments / Project (Stage 1)) or you can use the give command in VLAB:
give cs3431 Report1 <your file>.pdf
Good luck!
-
Report submission
Posted by Claude Sammut Thursday 16 October 2025, 02:49:11 PM.
We will be enabling the report submission later today. We'll send out another announcement.
Officially, the reports are due 11:59pm Friday, but we won't start marking until next week, so we won't impose any late penalties until next week.
-
Week 5 Demonstration
Posted by Claude Sammut Tuesday 07 October 2025, 05:30:29 PM.
To give you more time, for the week 5 demonstration, we will mainly be marking the wall follower. If you can't get the marker recognition working by then, don't worry, you can try again in week 7.
Please note that you will have to run cartographer with the wall follower since we want to see how good your map is and how smooth is your path. Sometimes jerky movements can tear the map.
It's important that your wall follower does not hit the coloured markers, so even if you aren't doing the marker recognition yet, we will still have the markers in the maze. So try not to hit them.
-
October long weekend
Posted by Claude Sammut Monday 29 September 2025, 10:30:52 AM.
Next week (week 4) we'll miss the Monday lecture and lab. The lecture slides will be put up on WebCMS anyway and I'll cover them in week 5, but you should look at them before then as they will help with knowing how to place the markers in the map correctly.
For the lab, we'll have extra time in the Design Studio on Tuesday 2pm, we'll see how many students can make it then.
-
Update to "see_marker.py"
Posted by Claude Sammut Monday 29 September 2025, 10:27:26 AM.
There's a new version of see_marker.py here .
This adds another another way of finding the distance to the marker, assuming you know the focal length of the camera.
-
Lecture Correction
Posted by Claude Sammut Monday 22 September 2025, 05:03:24 PM.
In today's lecture I incorrectly said that the arguments to update_cmd_vel were the speeds of the left and right motors. The argument names in the code are correct, they are the linear and angular speeds. e.g.
update_cmd_vel(0.2, 1.5) means drive with a linear speed of 0.2 and turn left (rotate with an angular rate 1.5 anti-clockwise)
update_cmd_vel(0.3, -1.5) means drive with a linear speed of 0.3 and turn right (rotate with an angular rate 1.5 clockwise)
update_cmd_vel(-0.2, 0.0) means drive backwards with a linear speed of 0.2.
-
Registering your MAC address
Posted by Claude Sammut Wednesday 17 September 2025, 04:01:21 PM.
To do the course assignments, you will have to connect your laptop to the TurtleBot3 that we assign to your group. This year we will be using UNSW's new IoT WiFi VLAN. This is a subnet especially for our class. We will need the MAC address of your laptop to register and authorise you to access the network. Please fill in this form as soon as you can. We will go through this in the lab session too.
-
Update to UTM VM for Macs
Posted by Claude Sammut Wednesday 17 September 2025, 03:54:43 PM.
Zijie made a few tweaks in the UTM image to better align with the name conventions in the course slides and materials, also with the intel image. You can find it here.
We will update WebCMS soon.
If you decide to use the one earlier, make sure you uncomment the line after to ensure the path for pkgs such as turtlebot3_nav, turtlebot3_cartagrapher being added properly.
In the new UTM image, the code you need for your assessment 1 is in ~/turtlebot3_ws. You shouldn't need to change the code in ~/turtlebot3_source_ws, as they are just the public TurtleBot3 pkgs which you can "call" but do not need to modify. You may need to refer to some files in it during your "research" phase later on for assessment2.
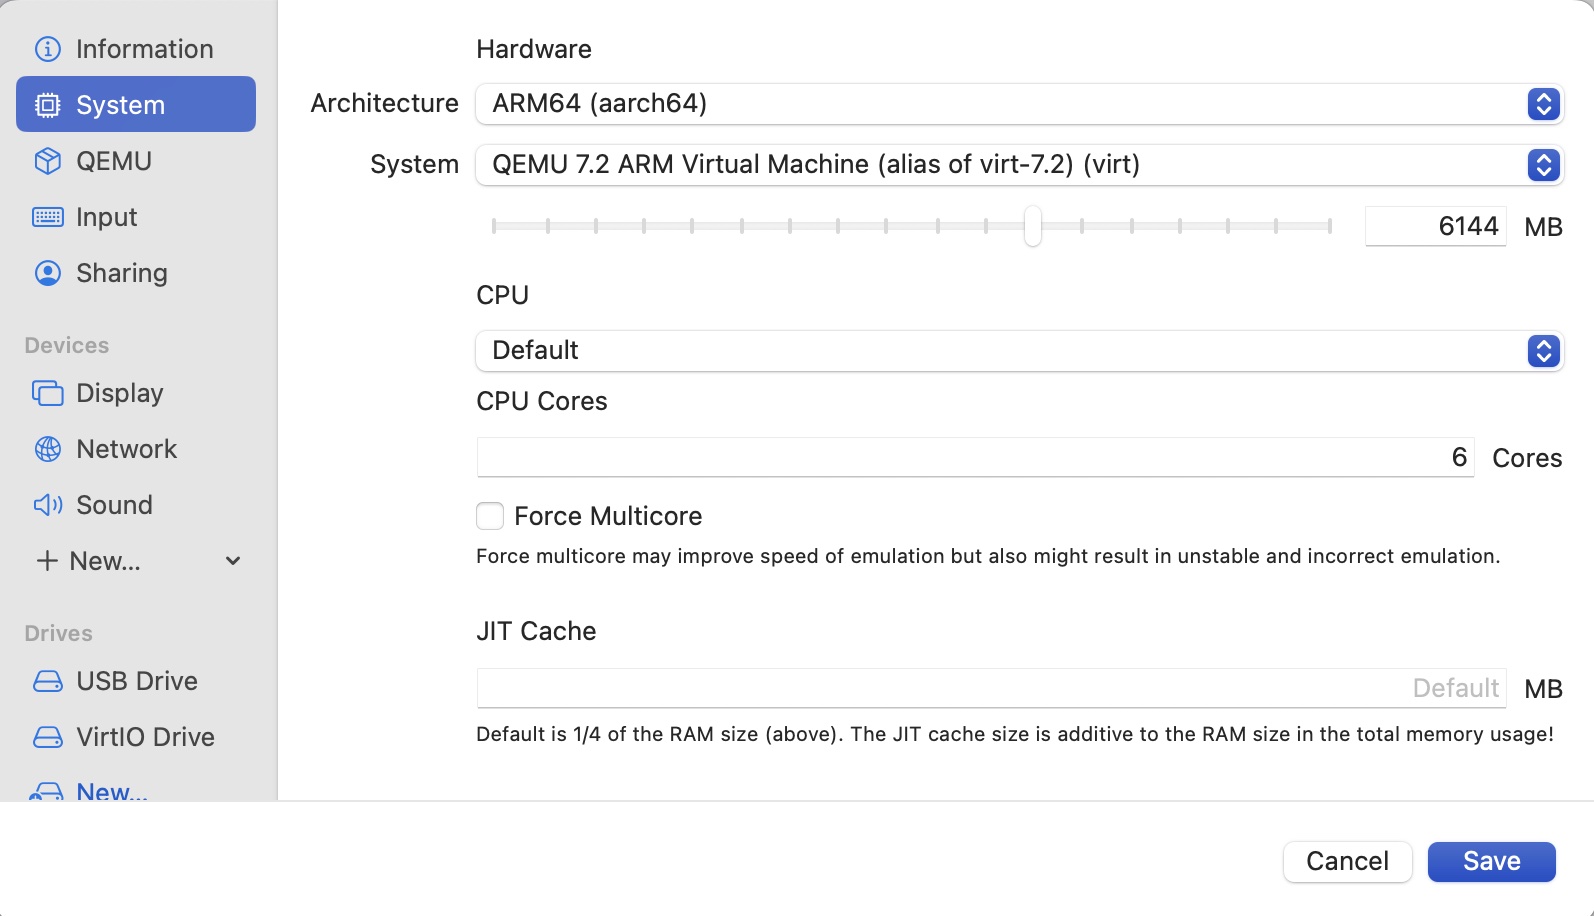
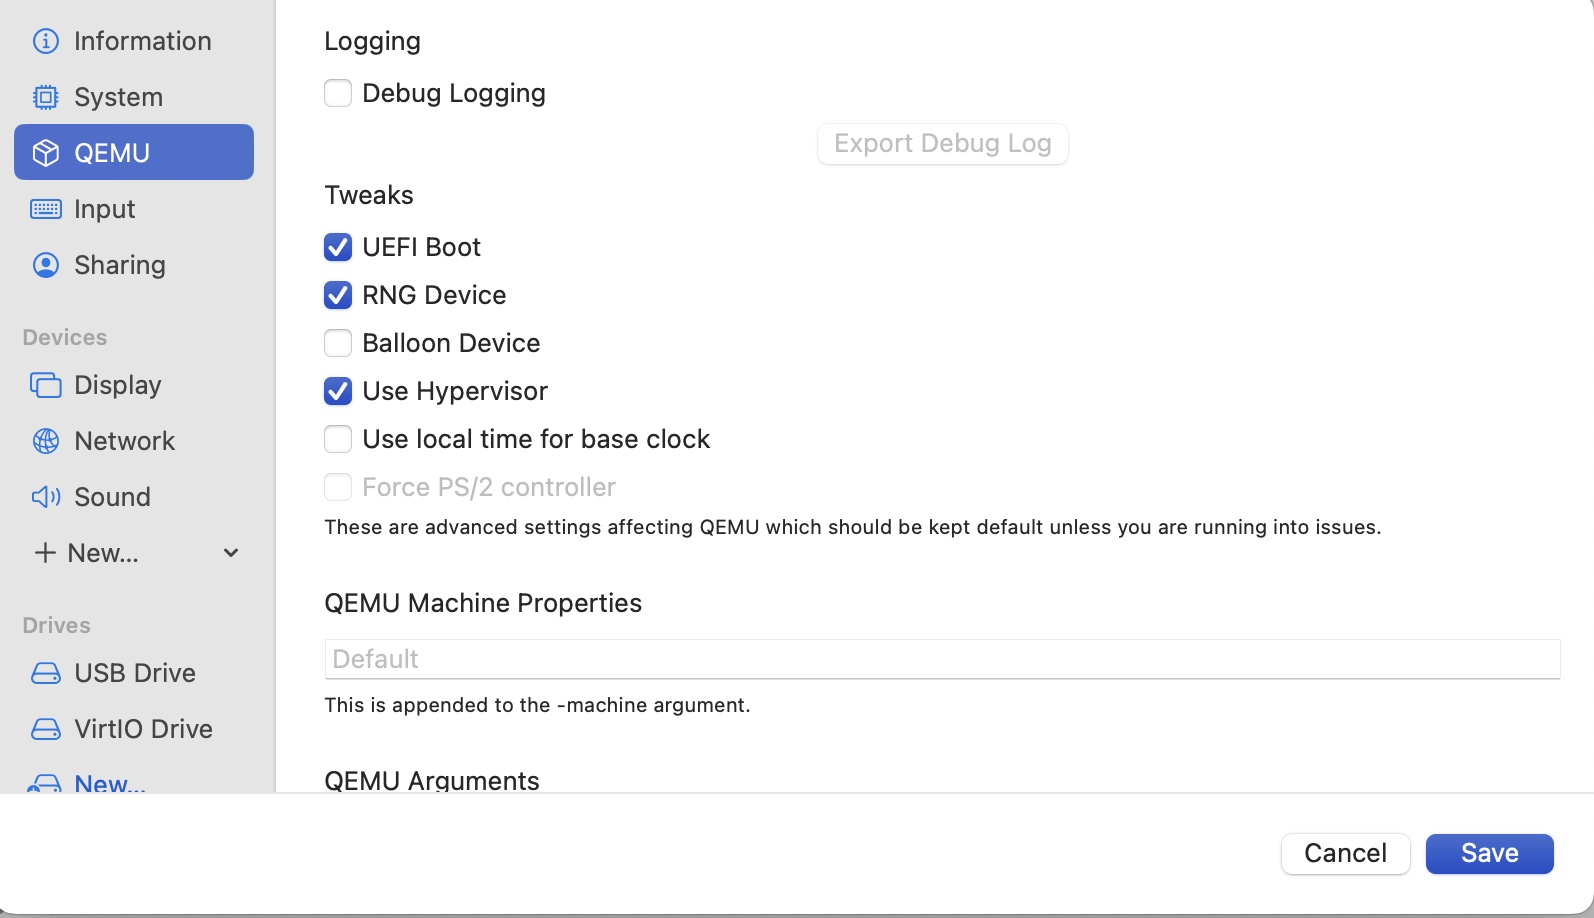
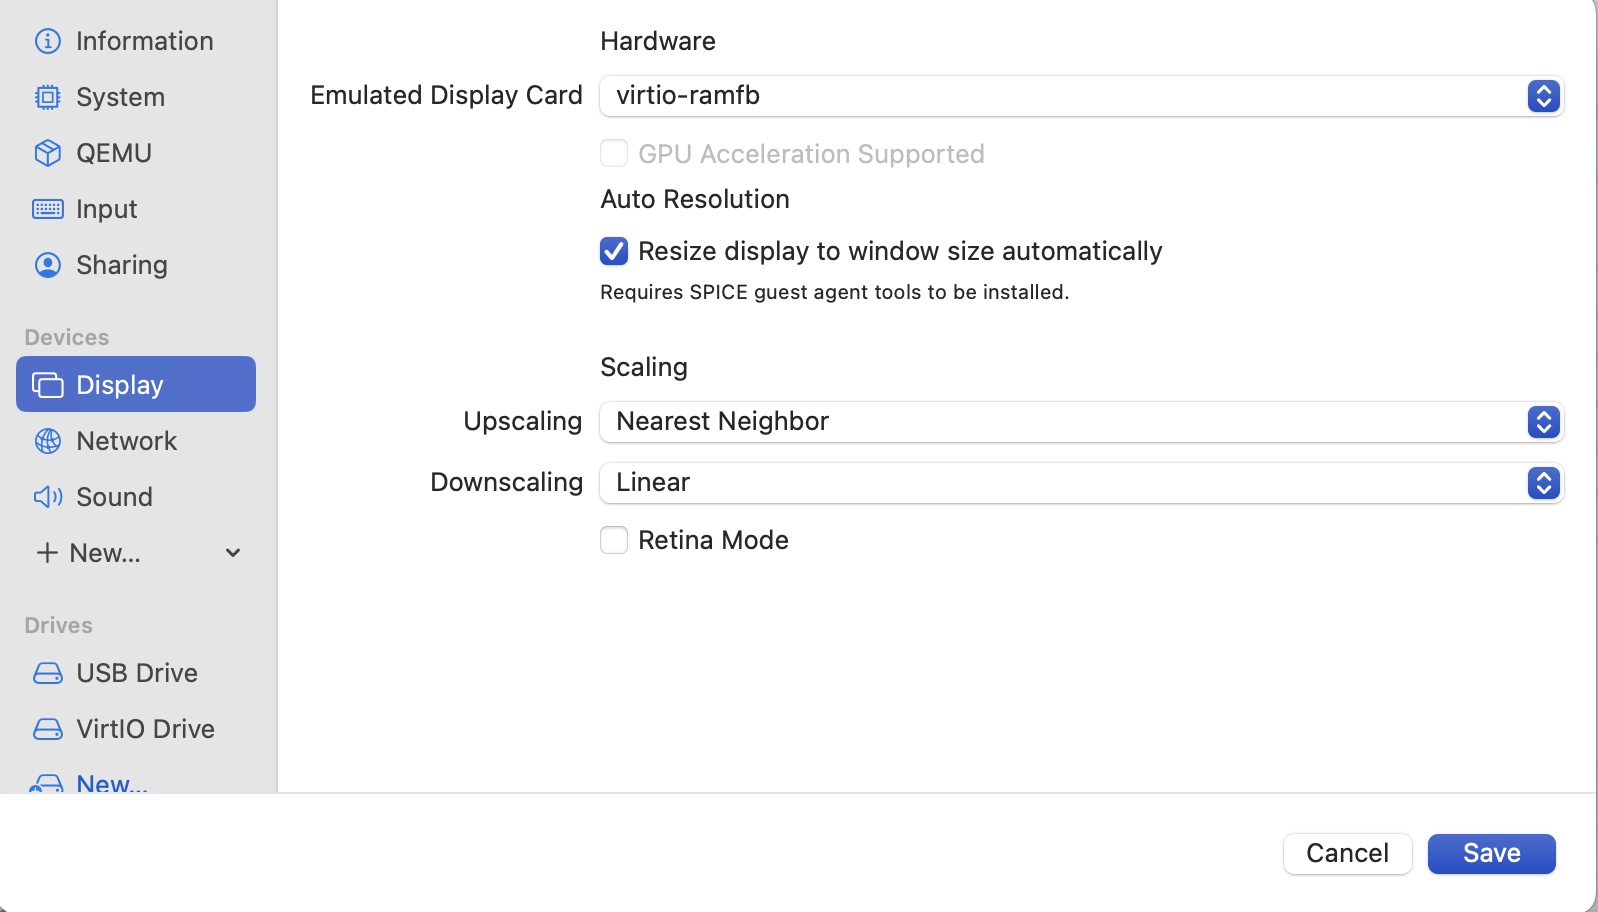
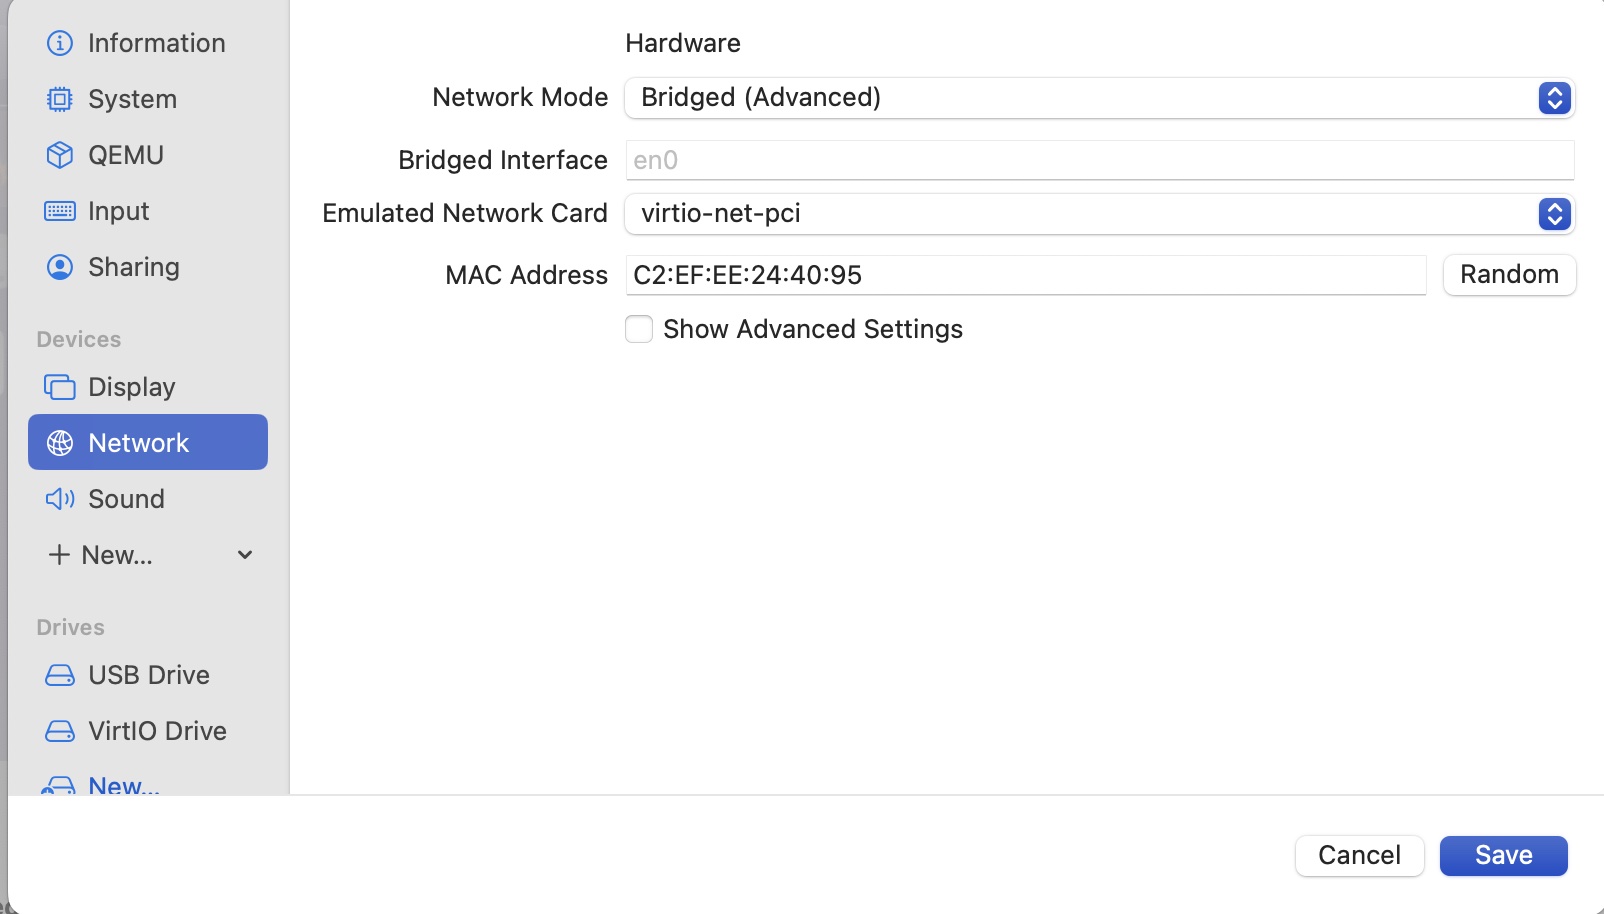
Here are the configs for UTM (do not use 10GB of memory if you only have 8).
In this link, https://github.com/utmapp/UTM/issues/2682#issuecomment-1064827650 . there are debug tips&hacks to deal with the UTM VM stucks at bootup. You may find that your VM hangs less frequently if the laptop is plugged into the power source.