
In this tutorial you will learn:
- How to implement token based authentication
- How to use requirements.txt
- How to deploy your project using Docker
The code is available on Github
Part 1: Token-based Authentication
There are several levels of security, and the most primary one is to authenticate clients to prevent malicious behaviors. In this lab, we explain how to secure RESTful services through Token Based Authentication. As the working example, we show how to secure the application created in Lab-02.
Token based authentication secures RESTful services by authenticating requests through a secure token which is valid only for a short period of time (e.g. 30 minutes). In this approach, first the server creates a specific token with an expiration date. Then in subsequent requests, the client sends the token along with the request-dependent data. Following explains how to secure requests using Token Based Authentication:
1    from functools import wraps
2    from flask import request,jsonify
3    from flask_restful import abort
4    from itsdangerous import (TimedJSONWebSignatureSerializer as Serializer)
5    SECRET_KEY = "A RANDOM KEY"

6    def authenticate_by_token(token):
7       if token is None:
8           return False
9       s = Serializer(SECRET_KEY)
10      username = s.loads(token.encode())
11      if username == 'admin':
12          return True
13      return False

14   def login_required(f, message="You are not authorized"):
15       @wraps(f)
16       def decorated_function(*args, **kwargs):
17           token = request.headers.get("AUTH_TOKEN")
18           if authenticate_by_token(token):
19               return f(*args, **kwargs)
20           return jsonify(message=message), 401
21       return decorated_function
For simplicity, this tutorial assumes that there is only a hard-coded user ( username = ‘admin’ and password= ‘admin’) which can access the secured endpoints, but you can easily extend it to retrieve users’ information.
- Line 1 : functools library helps to create decorator (next section we explain what a decorator is and why we need to create a decorator).
- Line 2 : request is used for getting Json data (in here request object would have username and password)
- Line 4 : itsdangerous is a library for cryptographically the data and transfer it between client and server.
- Line 5 : SECRET KEY, is the key that is required for encrypting and decrypting data
- Lines 6 to 13 : The authenticate_by_token function uses Serializer from the ‘ itsdangerous’ package to generate the token (an encrypted version of username in this example). Serializer requires a secret key which is used both for encryption and decryption purposes.
- Lines 14 to 21 : Sometimes we need all or a set of functions in our program to be ‘login enabled’. This means in order a user runs functions in our program, the user must be validated and logged into the system. There are two approaches to check whether a user authorized for running a function or not. The first approach is to check user credential in every single method, which is annoying and requires to write too many repetitive lines of code. The second approach is to use ‘decorative’ for adding the functionality to methods.In this approach once we define the functionality (e.g. login enabled), then we add it, as a decorator to functions that requires to support that functionality. For further information check FLASK DECORATOR
- Lines 17 to 21 : These lines carry out the main task of decoration, in here we check whether the authorization is correct or not.
Notice : ‘f’ is the function we are decorating (e.g. add_student)
Adding ‘login_required’:
For supporting login enabled functionality we can add the ‘login_required’ decorator on top of each method on top of all methods we want to secure.
import datetime
from flask import Blueprint
from flask import request, render_template, redirect, url_for, make_response, session, Flask
from lab_02_Blueprints.app.models import Teacher, Student
from lab_02_Blueprints.utils.serialize import deserialize, serialize
bp = Blueprint('app', __name__, url_prefix='')

@bp.route('/', methods=['GET'])
@login_required
def index():
    teacher = retrieve_teacher()
    if teacher is None:
        return redirect(url_for(".register"))
    return redirect(url_for(".show_students"))

@bp.route('/register', methods=["POST", "GET"])
@login_required
def register():
    if request.method == 'GET':
        return render_template("app/register.html")
    else:
        name = request.form.get("name")
        course = request.form.get("course")
        teacher = Teacher(name, course)
        session["_teacher"] = serialize(teacher)
        return redirect(url_for(".index"))

@bp.route('/students', methods=["GET"])
@login_required
def show_students():
    teacher = retrieve_teacher()
    if teacher is None:
        return redirect("register")
    else:
        return render_template("app/students.html", students=teacher.students.values())

@bp.route('/add', methods=["POST", "GET"])
@login_required
def add():
    if request.method == 'GET':
        return render_template("app/add.html")
    else:
        id = request.form.get("id")
        firstname = request.form.get("firstname")
        lastname = request.form.get("lastname")
        gender = request.form.get("gender")
        teacher = retrieve_teacher()
        teacher.students[id] = Student(id, firstname, lastname, gender)
        session['_teacher'] = serialize(teacher)
        return redirect(url_for(".show_students"))

@bp.route('/delete/<id>', methods=["GET", "POST", "DELETE"])
@login_required
def delete(id):
    teacher = retrieve_teacher()
    teacher.students.pop(id)
    session['_teacher'] = serialize(teacher)
    return redirect(url_for(".show_students"))

@bp.route('/edit/<id>', methods=["POST", "GET"])
@login_required
def edit(id):
    teacher = retrieve_teacher()
    student = teacher.students.pop(id)
    if request.method == 'GET':
        return render_template("app/edit.html", student=student)
    else:
        student.first_name = request.form.get("firstname")
        student.last_name = request.form.get("lastname")
        student.gender = request.form.get("gender")
        teacher.students[id] = student
        session['_teacher'] = serialize(teacher)
        return redirect(url_for(".show_students"))

@bp.route('/save')
@login_required
def save():
    serialized_teacher = session.get("_teacher")
    resp = make_response(render_template("app/save.html"))
    if serialized_teacher is not None:
        expire_date = datetime.datetime.now() + datetime.timedelta(days=90)
        resp.set_cookie("_teacher", serialized_teacher, expires=expire_date)
    return resp


def retrieve_teacher():
    serialized_teacher = session.get("_teacher")
    if serialized_teacher is None:
        serialized_teacher = request.cookies.get('_teacher')
    if serialized_teacher is not None:
        return deserialize(serialized_teacher)
    return None


@app.route("/auth", methods=['GET'])
def generate_token():
    parser = reqparse.RequestParser()
    parser.add_argument('username', type=str)
    parser.add_argument('password', type=str)
    args = parser.parse_args()
    username = args.get("username")
    password = args.get("password")
    s = Serializer(SECRET_KEY, expires_in=600)
    token = s.dumps(username)
    if username == 'admin' and password == 'admin':
        return token.decode()
    return 404
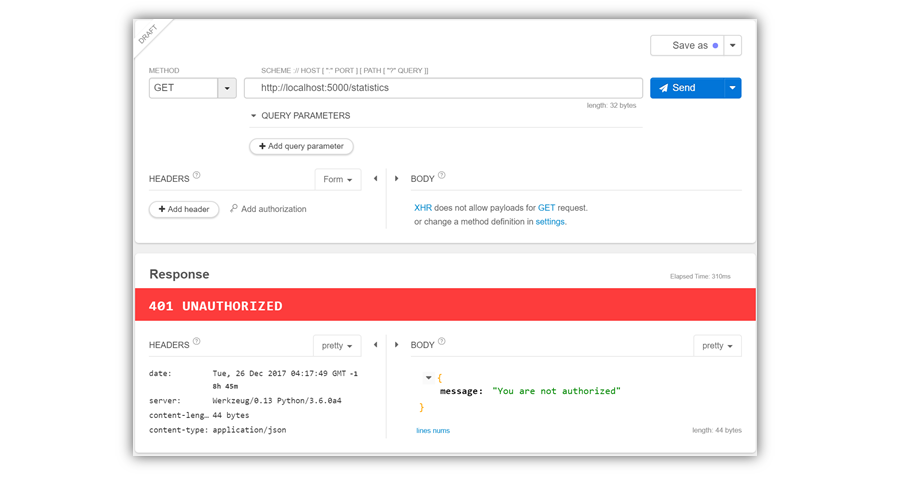
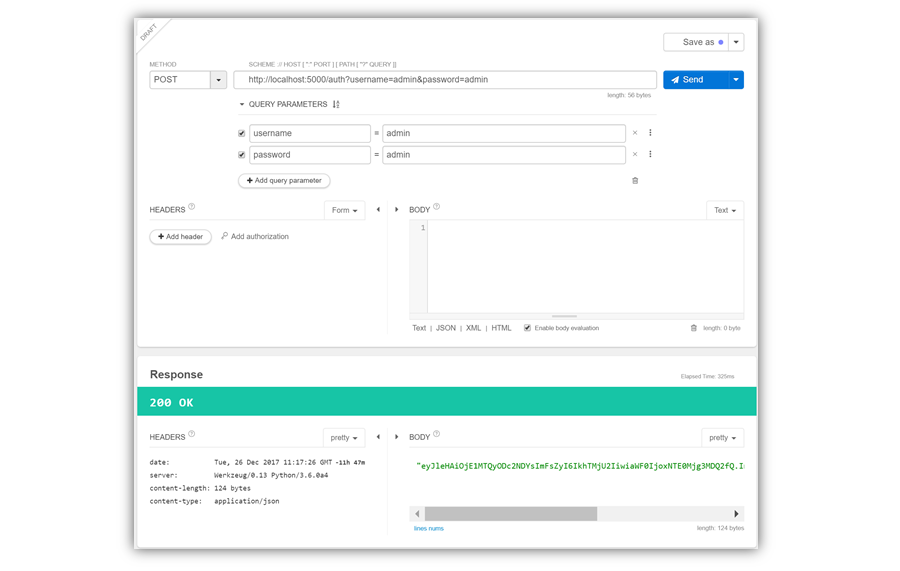
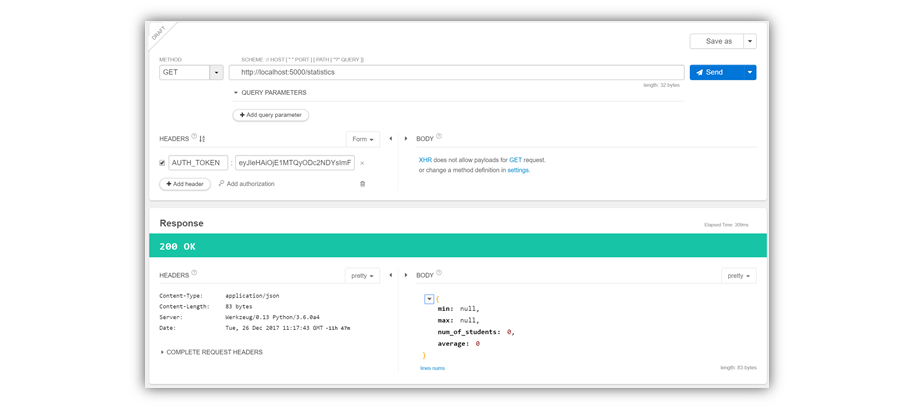
To generate token, we also added a new function called "generate_token", to generate a token given username and password. later the user need to put this token in the request header to access the secure endpoints. Now you can test your application. First test if the view function is secured:
Apart from the tips covered here, there are some other tips that you should have in mind in real applications:
- Do not allow users to provide weak passwords
- Encrypt passwords before storing them in databases
- Protect your forms from Cross site request forgery (CSRF) attacks
- Use token-based authentication based on JWT
- Run your application over HTTPS
- Take a look at Flask-Security
Part 2: Creating Requirements.txt File using PyCharm
Requirements files" are files containing a list of items to be installed using pip install . In particular, a Requirements file is just a list of pip install arguments placed in a file. Following we explain how to use the ‘requirement.txt’ file for installing python packages.
Requirement.txt file format:
Each line of the requirements file indicates something to be installed, and like arguments to pip install . For example, following file contains three packages named Flask,Jinja2 and requests.
Here is an example of ‘requirements.txt’:
Flask
Jinja2
requests
Creating and installing requirements file using pyCharm is straightforward.
- create a new text file (File Menu > New > File), and name the file requirements.
- From the File menu click on settingsà preferences dialog boxà python integrated tools :
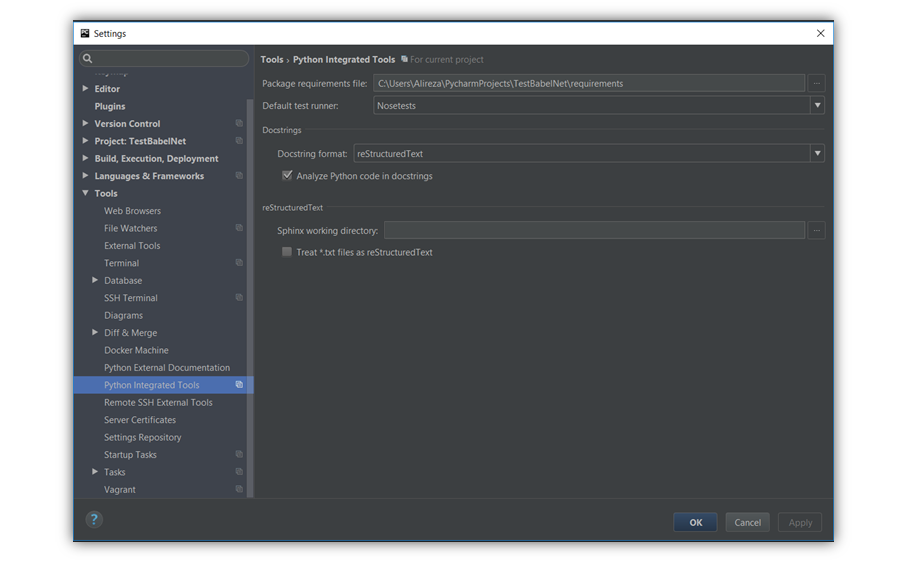
select the created requiremets.txt file in ‘Package requirements file’ section, and click on ‘ok’. In this manner, you define the selected file would act as the requirements file in your project. The next step, is to populate the packages to the requirements file.
For adding a packages to requirements file do as below.
In an import section of a python file, click the packages which is not imported. PyCharm suggest a fix: Click on ‘Add requirement <LIBRARY> (e.g. pandas) to requirements:

This would automatically add the library to the requirements.txt file in your project:

Deploying packages in requirements file
After populating libraries into the requirements file we can install the libraries elsewhere. Installing the libraries is simple.
- Create a new project.
- Paste the ‘requirements’ file into the root of your project

- Set up the virtual environment (for learning how to setup venv in python please refer to lab week 01 PyCharm - Creating Projects & Managing Libraries
- After setting up the virtual environment, open up the terminal window.
-
Install the libraries using the following command
pip install -r requirements.txt
Part 3: How to Deploy Your Application on Docker
In this section, you will learn how to deploy you web application using Docker. We will not include instructions on how to download and install Docker – You should download a ‘community edition’ of Docker, suitable for your machine configuration. The download page is available here; https://www.docker.com/community-edition
- install docker in Linux .
- Open your terminal and add your user to dockers using the following commands:
-
Create the Flask App and Deployment files
Create a directory called " app" , and inside this directory add a new file named " main.py" , and add the following python code; be aware that by convention the python file which you want to start your application with must be named as "main.py".from flask import Flask app = Flask(__name__) @app.route('/') def hello_world(): return 'Hello World' if __name__ == '__main__': app.run(debug=True,host='0.0.0.0') - Set up a virtual environment in the directory using the tutorial provided in Lab-1, and activate the virtual environment. Then make a file name "requirements.txt" that has all your dependencies in it. For this simple Flask app, all you need is
- And create the Dockerfile by copying and pasting the code below:
-
Inside the project directory run the following command to build the docker image
$ docker build -t hello_world .
- Run your docker container
- Browse "localhost" in your computer
$ sudo groupadd docker
$ sudo gpasswd -a ${USER} docker
$ sudo service docker restart
This will allow you to run containers without using root permissions.
Flask==0.12.2
FROM tiangolo/uwsgi-nginx-flask:python3.6
COPY ./app /app
FROM tells Docker what image to pull from the Docker repository, and COPY copies code into the "app" directory. Finally your project structure must look like the below:
Project
  ├── Dockerfile
  ├── requirements.txt
  ├── virtual-environment-directory
  └── app
     └── main.py
$ docker run -p 80:80 -t hello_world
For more information, we encourage you to read the article by Charlie Brooke named " Docker for Flask Developers. " Here is also a list of Docker commands which might be helpful in practice:
-
Stopping all containers
$ docker stop $(docker ps -aq)
-
Removing all containers
$ docker rm $(docker ps -aq)
-
List Docker containers (running, all, all in quiet mode)
$ docker container ls -a
Resource created Monday 09 April 2018, 04:09:41 PM, last modified Thursday 13 September 2018, 01:44:04 PM.