
The code can be downloaded from github .
This lab explains how to use NoSql databases for storing and manipulating data. NoSQL systems store and manage data in ways that allow for high operational speed and great flexibility. These databases contrary to traditional relational databases, which sacrificing performance and scalability for the ACID properties , largely ditched those ACID guarantees for improving speed and scalability. That’s why NoSql databases are the main theme in every big data processing application.
In this lab we explain how to couple a NoSql database (MongoDB) with Python. First, we explain how to install ‘MongoDB’, then we introduce a library (mongoengine), which bridges between MongoDB and Python, and facilitates the CRUD operations.
Installing MongoDB
To install MongoDB execute the following command in your terminal (for further detail on installing MongoDB, please refer to Installation Guideline ):
$ sudo apt-get mongodb
Running MongoDB:
After installing MongoDB, we need to run an instance of the database. Thus, run the following command in terminal.
$ sudo service mongodb start
Install mongoengine
Monogoengine is an Object-Document-Mapper (ODM) written in Python for working with MongoDB. To install ‘Mongoengine’ use the following pip command.
$ pip3 install mongoengine
Mongoengine:
Following we explain different functions of ‘mongoengine’ library.
Connecting to MongoDB: To connect to a MongoDB database, we use the ‘connect’ command. This command receives several parameters, including database name, username, and password. To use this command, we require to import ‘connect’ library from ‘mongoengine’.
1    from mongoengine import connect
2    connect('DATABASE_NAME', username='YOUR_USERNAME', password='YOUR_PASSWORD')
Document: In a NoSql database, instead of dealing with concepts, such as rows and tables, we use documents and collections. A document in a NoSql database is somewhat equivalent to a row in RDBMS, and a collection is similar to a table. NoSql databases contrary to RDBMS (MYSQL, ORACLE) databases are schemaless. However, ‘Mongoengine’ allows to define schema to avoid possible typos and errors in working with these databases.
Mongoengine allows you to define schemata for documents as this helps to reduce coding errors. To define schema for a document we need to create a new class that inherits from ‘document’, then we add the fields object (see field section) as the class attribute to the document class.
1    class User(Document):
2        email = StringField(required=True)
3        first_name = StringField(max_length=50)
4        last_name = StringField(max_length=50)
Above code defines a document that contains three fields (email, last_name, and first_name)
Field: This section explains how to define fields of a document. There are variety of field type that can be selected for a document, including StringField, BinaryField, BooleanField, and etc. Following we explain define arguments cab be used for defining a field.
- required: specifies the given field is mandatory.
- unique (Default: False): When True, no documents in the collection will have the same value for this field.
- primary_key (Default: False) : When True, use this field as a primary key for the collection.
List fields: MongoDB allows storing lists of items. To add a list of items to a ‘Document’, use the ‘ListField’ field type. ‘ListField’ takes another field object as its first argument, which specifies which type elements may be stored within the list:
1    class Page(Document):
2        tags = ListField(StringField(max_length=50))
Embedded documents: MongoDB has the ability to embed documents within other documents. To create an embedded document, just define a document as usual, but inherit from ‘EmbeddedDocument’ rather than ‘Document’.
1    class Comment(EmbeddedDocument):
2        first_name = StringField(required=True, max_length=50)
3        last_name = StringField(required=True, max_length=50)
Above code defines an embeddedDocument named ‘Comment’. This document contains to String fields named ‘first_name’ and ‘last_name’.
To embed a document within another document, we can use ‘EmbeddedDocumentField’.
1    class User(Document):
2        email = StringField(required=True)
3        first_name = StringField(max_length=50)
4        last_name = StringField(max_length=50)
5        comments = ListField(EmbeddedDocumentField(Comment))
In above code (line 5) we presented how to embed the ‘Comment’ document to the ‘User’ document.
Example
To better understand differences between conventional object relational mapping approach (ORM) with Object document mapper (ODM), we created a sample application. The application contains two objects: teacher and student, and intends to demonstrate how a teacher can store students’ information into MongoDB using ‘mongoengine’ and Python.
Typically, in an ORM based application for every object (e.g. teacher, students) we create a table and define the relationship among tables. For example, in our application a student is associated with a teacher. In a relational database to retrieve a teacher with its associated students, we would have to retrieve the teacher from database, then, we query the database again for retrieving students associated with the teacher. This works, but there is no real reason to be storing the students separately from their associated teachers. However, using MongoDB we can store the students as a list of embedded documents directly on a teacher document. An embedded document should be treated no differently than a regular document; it just doesn’t have its own collection in the database. Following shows how to define ‘teacher’ and ‘student’ objects.
1    from mongoengine import StringField, IntField,
                        Document, EmbeddedDocument,
                        ListField, EmbeddedDocumentField
2    class Student(EmbeddedDocument):
3        id = IntField(required=True, primary_key=True)
4        first_name = StringField(required=True, max_length=50)
5        last_name = StringField(required=True, max_length=50)
6        gender = StringField(required=True, max_length=50)

7        def __init__(self, id, first_name, last_name, gender='MALE', *args, **kwargs):
8             super().__init__(*args, **kwargs)
9             self.id = id
10            self.first_name = first_name
11            self.last_name = last_name
12            self.gender = gender

13    class Teacher(Document):
14         id = IntField(required=True, primary_key=True)
15         name = StringField(required=True, max_length=50)
16         course = StringField(required=True, max_length=50)
17         students = ListField(EmbeddedDocumentField(Student))

18         def __init__(self, id, name, course, students=[], *args, **values):
19            super().__init__(*args, **values)
20            self.id = id
21            self.name = name
22            self.course = course
23            self.students = students
- Line 1 : Imports Libraries for defining documents
- Line 2-6 : Defines the embedded document. This document contains four different fields, including id, first_name, last_name, and gender.
- Lines 7 to 12 : defines the constructor of student class to receive the input values.
- Lines 13 to 17 : defines the ‘Teacher’ document and adds the ‘student; document as the embedded document.
- Lines 18 to 23 : defines the constructor of teacher class.
Performing CRUD operations: After creating documents, we can store and retrieve data from MongoDB. Thus, create a new python script file and add the following code to the file.
Saving teacher and students information into MongoDB.
     from mongoengine import connect
     from lab_07_MongoDB.models import Teacher, Student
1    def save_information():
         t1 = Teacher(1, 'Helen','Paik', [Student(1, "Tom", " Ainsley")])
         t2 = Teacher(2, 'John', 'Hardy')
         connect('teacher')
         # add teachers to the database
         t1.save()
         t2.save()

2    def get_all_teachers ():
         connect('teacher')
         for t in Teacher.objects:
              print(t.id, t.name)

3    def get_one_teacher ():
         connect('teacher')
         for t in Teacher.objects(id=1):
             print(t.id, t.name)

4    def update_teacher_info():
         connect('teacher')
         Teacher.objects(id=2).update(name='George')

5    def delete_teacher_info():
         connect('teacher')
         Teacher.objects(id=2).delete()

if __name__ =='__main__':
     save_information()
     get_all_teachers()
     delete_teacher_info()
- Function 1: creates two instances of Teacher, and store values into Mongodb.
- Function 2: returns information of teachers in database
- Function 3: returns information of the teacher with id =1
- Function 4: updates the name of the teacher with id =2
- Function 5: delete the information of the teacher with id =2
- Notice: in here we hypothesis a database named ‘teacher’ is already exist.
Using MongoDB as a Service: mLab
While you can install your own instance on your computer, there services which offer database as a service. In this part of tutorial, you will learn how to use mLab.
-
Register on
https://mlab.com/
-
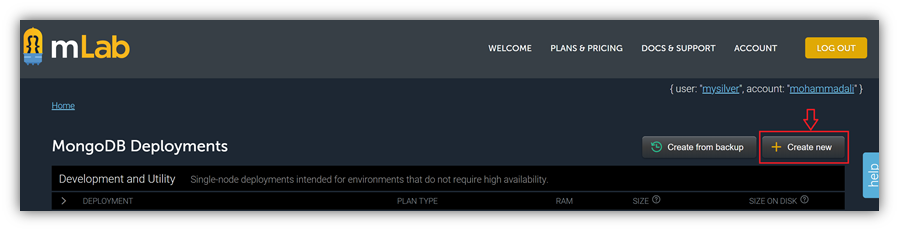
Login into your account and clieck on “Create New”
-
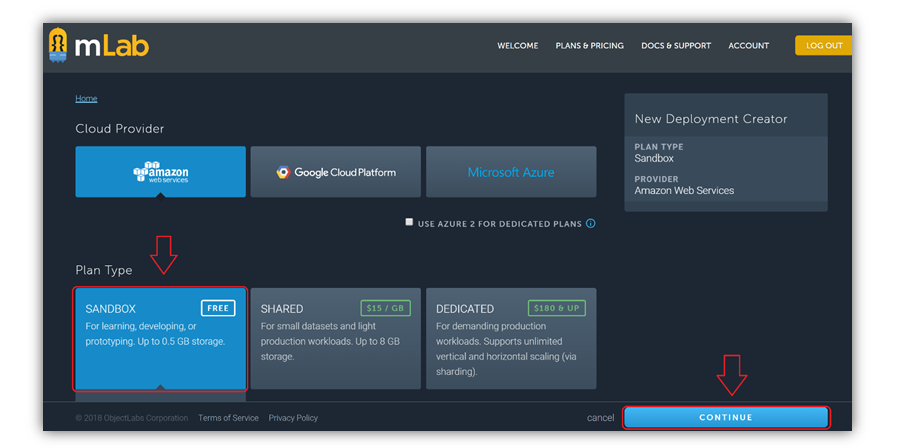
Choose a free plan by
clicking on “SANDBOX”, and then click on
“continue”
-
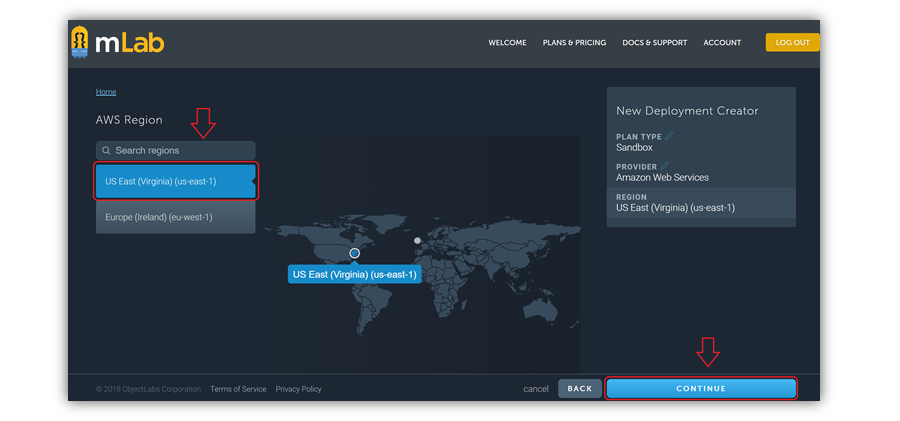
Select a Region and then
click on “continue”
-
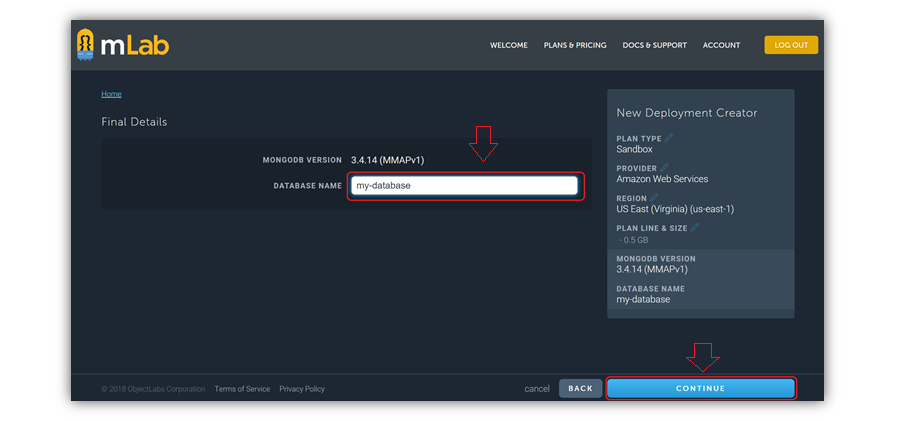
Type your database name
and click on “continue”
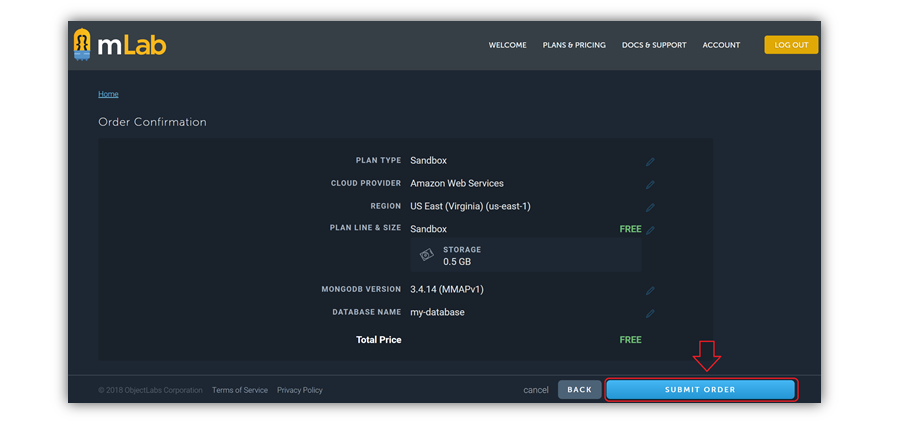
-
Submit your order
-
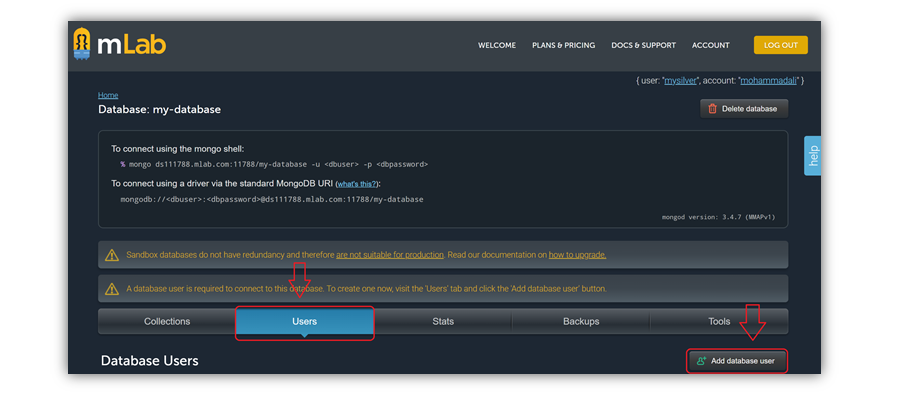
Click on your database
to open it

-
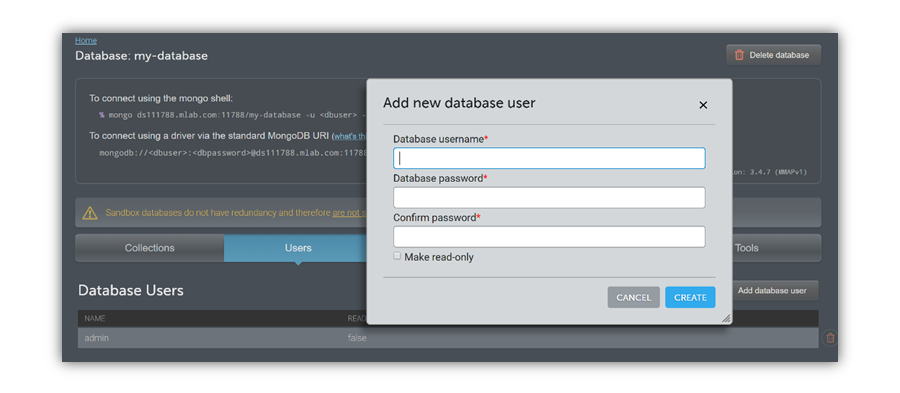
Click on the “Users” tab
and to create a new user for your database
As you see in the below picture, there is connection string that you need to copy and use it later to connect your remote DB
-
Now you can connect to the
database using the user your created and the following connection string:
connect(
    host='mongodb://<YOUR_USERNAME>:<YOUR_PASSWORD>@<DS_NUMBER>.mlab.com:<PORT_NUMBER>/<YOUR_DATABASE_NAME>'
)
Be noted that you need to replace the variable in the above string using your username and password, and the string provided in the previous step.
Resource created Saturday 14 April 2018, 08:24:29 AM, last modified Saturday 21 July 2018, 04:14:01 PM.